

Make a PVC poolside towel rack
The use of PVC has gained popularity on the DIY scene. It’s the ideal material to use when looking for quick and easy projects
By Gareth Greathead
Materials
• 6m of 40mm PVC tube
• 8 x 40mm elbows (F)
• 10 x 40mm T-pieces (G)
• 1 x PVC cement
Tools
• Hacksaw
• Permanent marker or pencil
• Tape measure
• Half round file
Cutting list
• 4 x 100mm PVC (Part A)
• 4 x 200mm PVC (Part B)
• 4 x 400mm PVC (Part C)
• 5 x 800mm PVC (Part D)
• 4 x 180mm PVC (Part E)
Project guide
Difficulty: Easy
Cost: ±R400
Time: 3 hours
PVC is very easy to work with and the entire family can create unique pieces together. Lengths of PVC come
in a variety of shapes and sizes. These are used together with PVC fittings such as elbows, T-pieces and
couplings to make corners and give shape to the concept.
Everyone needs a place to hang their towel before swimming as well as afterwards to allow it to dry.
The Home Handyman set out to make a poolside towel rack from 40mm lengths of round PVC pipe and fittings.
The rack we built can be used at home or the sides can be separated for transportation to the beach or
public swimming pools.
Step-by-step guide
Step 1: Begin by marking out the measurements on the full lengths of PVC using the permanent marker or pencil. Start cutting the shorter lengths of PVC, beginning with the 4 x 10mm long pieces (A parts), with a hacksaw and move down the cutting list until all the pieces are cut. Initially we tried to cut the PVC without clamping; while this is possible, it does make cutting the pieces straight difficult. Also, we cut all the pipes to the exact length stipulated in the cutting list, but, unless you cut all of them perfectly straight, cutting them slightly longer is easier.
Step 2: Once you have cut all the pieces of PVC to approximate length, file the ends flat with the flat side of the file, then use the half round to clean the burrs from the cut edges. The ends of the pipes don’t have to be exactly straight, but burrs will prevent the pipes from fitting snugly into the fittings.
Step 3: Knowing that some of the lengths were filed substantially, we decided to assemble one side of the rack without glue to test our accuracy. We measured the lengths in-between the fittings (elbows and T-pieces) and made adjustments using the file where necessary to get the pipes parallel and equal in length.
Once all the pipes are equal on one side, assemble and adjust/ file the other side to match the first. After both sides are assembled, measure the lengths in-between the elbows on corresponding sides again to make sure they are equal. If they are not the same and the pieces are glued together, your rack will not be sturdy.
Step 4: With both sides assembled, the centre poles (Part D) can be inserted. The whole piece can now be pressed flat against a level floor and manipulated by hand until everything is square.
Step 5: PVC glue works by melting the plastic in contact with the glue together and cannot be moved. If you disassemble the entire piece and glue each piece individually, it will not end up straight at the end. The only way to maintain the current positioning is to remove each piece individually and glue it in the set position permanently. As each elbow has to be assembled at a 90˚ angle, it is best to start at the top and glue one component at a time.
Things we would do differently
• We would have cut the lengths of PVC slightly longer than the cutting list stipulates. Thereafter the pieces can be filed down to size accurately without affecting the final dimensions of the piece.
• A lot of cuts need to be made and it may be easier to use a jigsaw
to cut the lengths of PVC if you have one.
• Clamp the full lengths of PVC in a table vice for quicker and more accurate cuts.


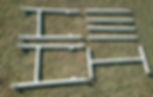
Parts list

Start by marking and cutting the shorter sections of pipe with a hacksaw

File the end straight

ile the end straight Clean the burr from the inside and outside of the pipe

Assemble one of the sides without glue and measure the lengths in between the elbows. These will have to be matched to the other side

Before applying glue insert the longest pipes between the sides and manipulate the piece until it sits square

Remove and glue each piece individually starting with the fittings at the top
By gluing the sections as shown in the picture the rack will become transportable

Apply a thick layer of PVC glue to the fitting and the pipe with a hobby brush and press the parts together
